
安全数字 ( SD ) 是由 SD 卡协会 ( SDA ) 开发的一种非易失性存储卡格式,用于手机、相机等便携式设备。安全数字包括以下四个卡系列:
1. SDSC:标准容量 SD。其存储容量为 2GB,使用 FAT-12 和 FAT-16 文件系统。
2. SDHC:高容量SD卡。存储容量从2GB到32GB不等,采用FAT-32文件系统。
3. SDXC:eXtended Capacity SD。存储容量从32GB到2TB不等,使用exFAT文件系统。
4. SDIO:将INPUT/OUTPUT功能与数据存储结合在一起。
SD 卡有不同的尺寸-
常规 SD - 1.25 x 0.95 英寸
迷你 SD - 0.87 x 0.79 英寸
Micro SD - 0.43 x 0.59 英寸
这里我们使用微型 SD 卡进行连接。
文件系统
SD 卡是一种块寻址存储设备,主机设备可以通过指定块号来读取或写入固定大小的块。大多数 SD 卡都预先格式化了一个或多个 MBR(主引导记录)分区,其中第一个分区包含文件系统,使其能够像硬盘一样工作。
1. 对于 SDSC 卡
容量小于 16 MB - FAT 12
容量在 16 MB 至 32 MB 之间 - FAT 16
容量大于 32 MB - FAT 16B
2. 对于 SDHC 卡
容量小于 7.8 GB - FAT 32
容量大于 7.8 GB - FAT 32
3. 对于 SDXC 卡
外置FAT
笔记
1. Arduino 库 仅支持 FAT16 和 FAT32 文件系统。请确保您的 SD 卡 仅使用这两种文件系统格式化, 否则您将收到初始化错误。
2. 要格式化您的 SD 卡,您可以从以下链接下载 SD 格式化程序 - https://www.sdcard.org/downloads/formatter_4/
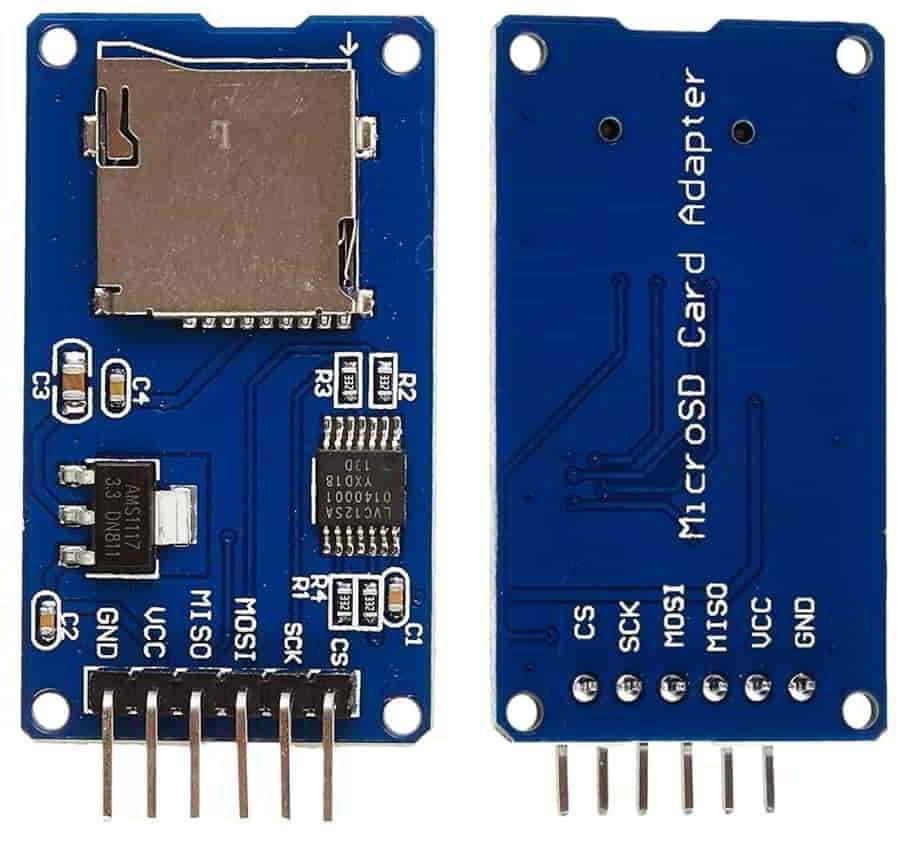
微型 SD 卡模块是一种简单的解决方案,用于将数据传输到标准 SD 卡或从标准 SD 卡传输数据。该模块具有与任何 SD 卡兼容的 SPI 接口,并使用 5V 电源,因为它具有与 ESP32 兼容的内部 3.3V 稳压器。
SD 卡模块引脚排列:
引脚名称 描述 CS 芯片选择 同步脉冲编码调制 钟 味噌 主入从出 莫西 主出从入
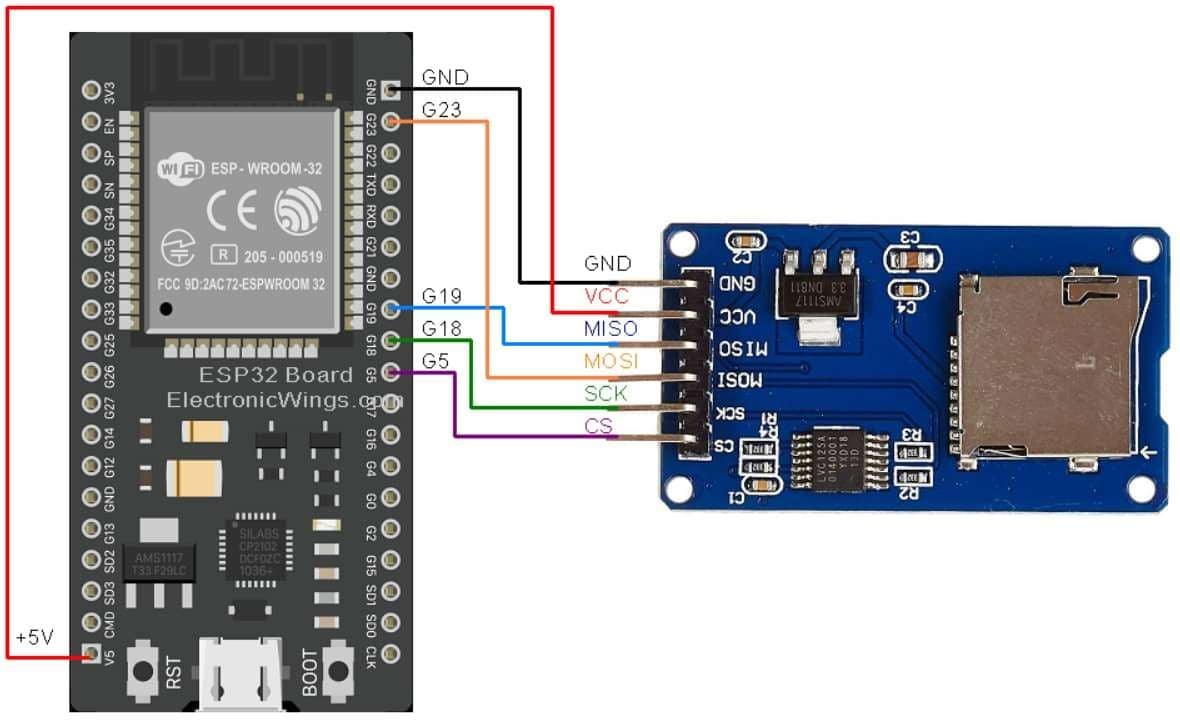
该图显示了 SD 模块与 ESP32 的详细连接。
MOSI - 引脚 23
MISO-19针
CLK-引脚18
CS-引脚5
ESP32 与 Micro SD 卡接口
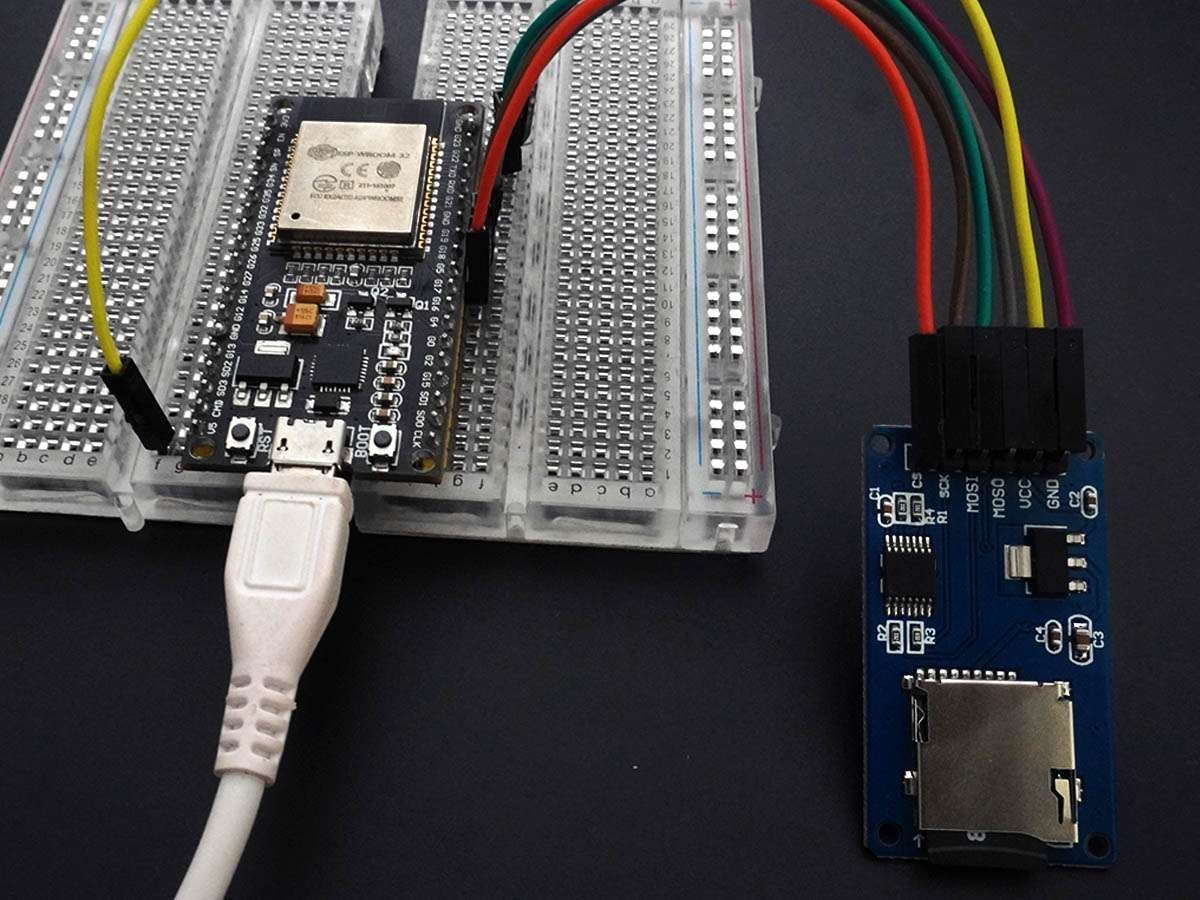
我们将把 MicroSD 卡与 ESP32 连接起来并对其执行读写操作。
这里我们将使用 Arduino IDE 提供的内置代码。
Arduino IDE 中的代码使用两个库文件 –
SPI.hSD.h
这些库文件直接包含用于SD卡读写操作的函数定义。
要访问 Arduino IDE 中的代码,您可以按照以下步骤操作:
打开 IDE ► 单击文件 ► 单击示例 ► 选择 SD ► 打开 ReadWrite
为了您的简单起见,我们在这里提供了相同的代码。
/* https://www.electronicwings.com/ SD Card Interface code for ESP32 SPI Pins of ESP32 SD card as follows: CS = 5; MOSI = 23; MISO = 19; SCK = 18; */File myFile;const int CS = 5;void WriteFile(const char * path, const char * message){ // open the file. note that only one file can be open at a time, // so you have to close this one before opening another. myFile = SD.open(path, FILE_WRITE); // if the file opened okay, write to it: if (myFile) { Serial.printf("Writing to %s ", path); myFile.println(message); myFile.close(); // close the file: Serial.println("completed."); } // if the file didn't open, print an error: else { Serial.println("error opening file "); Serial.println(path); }}void ReadFile(const char * path){ // open the file for reading: myFile = SD.open(path); if (myFile) { Serial.printf("Reading file from %s ", path); // read from the file until there's nothing else in it: while (myFile.available()) { Serial.write(myFile.read()); } myFile.close(); // close the file: } else { // if the file didn't open, print an error: Serial.println("error opening test.txt"); }}void setup() { Serial.begin(9600); // Set serial baud rate to 9600 delay(500); while (!Serial) { ; } // wait for serial port to connect. Needed for native USB port only Serial.println("Initializing SD card..."); if (!SD.begin(CS)) { Serial.println("initialization failed!"); return; } Serial.println("initialization done."); WriteFile("/test.txt", "ElectronicWings.com"); ReadFile("/test.txt");}void loop() { // nothing happens after setup}
首先,添加支持文件,<SPI.h>即<SD.h>
#include <SPI.h>#include <SD.h>
定义 myFile 对象
File myFile;
设置芯片选择的 GOIP 引脚号
const int CS = 5;
要将内容写入文件,请使用该WriteFile()函数。写入时,请将路径和消息作为参数传递。
void WriteFile(const char * path, const char * message){  // open the file. note that only one file can be open at a time,
  // so you have to close this one before opening another.
  myFile = SD.open(path, FILE_WRITE);
  // if the file opened okay, write to it:
  if (myFile) {
    Serial.printf("Writing to %s ", path);
    myFile.println(message);
    myFile.close(); // close the file:
    Serial.println("completed.");
  }
  // if the file didn't open, print an error:
  else {
    Serial.println("error opening file ");
    Serial.println(path);
  }}
例子:
WriteFile("/test.txt", "ElectronicWings.com");
该ReadFile()函数用于从文件中读取内容并将其显示在串行监视器上,在此函数中将路径作为参数传递。
void ReadFile(const char * path){  // open the file for reading:
  myFile = SD.open(path);
  if (myFile) {
     Serial.printf("Reading file from %s
", path);     // read from the file until there's nothing else in it:
    while (myFile.available()) {
      Serial.write(myFile.read());
    }
    myFile.close(); // close the file:
  }
  else {    // if the file didn't open, print an error:
    Serial.println("error opening test.txt");
  }}
例子:
ReadFile("/test.txt");
我们已经以9600波特率启动串行通信。
Serial.begin(9600); // Set serial baud rate to 9600
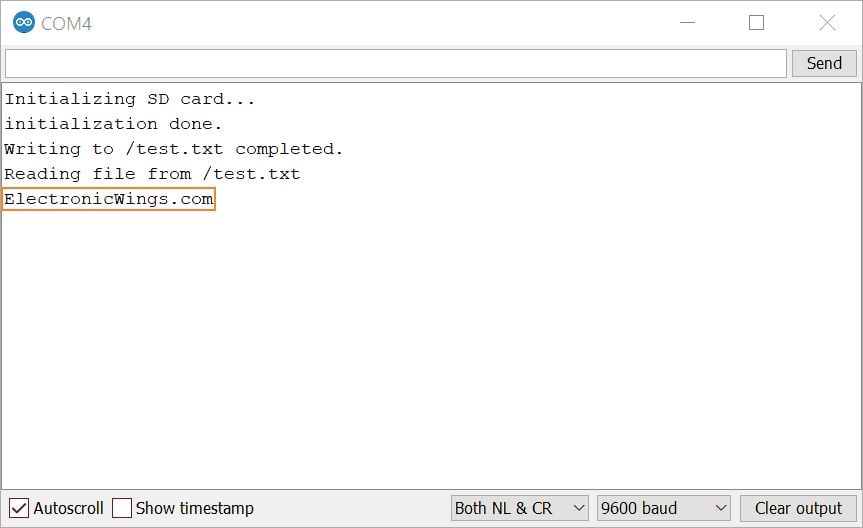
初始化 SD 卡并在串口监视器上打印
Serial.println("Initializing SD card...");if (!SD.begin(CS)) {Serial.println("initialization failed!");return;}Serial.println("initialization done.");
在 /test.txt 路径上写入ElectronicWings.com文本
WriteFile("/test.txt", "ElectronicWings.com");
/test.txt从路径读取测试文件
ReadFile("/test.txt");
循环中没有可重复运行的代码。
void loop() { // nothing happens after setup}


深圳市芯存者科技有限公司
电话:176-6539-0767
Q Q:135-0379-986
邮箱:xcz@xczmemory.cn
地址:深圳市联创商务中心13层1308室

